给图像添加边界
Theory
Note
以下内容来自于Bradski和Kaehler的大作 Learning OpenCV 。
前一节我们学习了图像的卷积操作。一个很自然的问题是如何处理卷积边缘。当卷积点在图像边界时会发生什么,如何处理这个问题?
大多数用到卷积操作的OpenCV函数都是将给定图像拷贝到另一个轻微变大的图像中,然后自动填充图像边界(通过下面示例代码中的各种方式)。这样卷积操作就可以在边界像素安全执行了(填充边界在操作完成后会自动删除)。
本文档将会探讨填充图像边界的两种方法:
- BORDER_CONSTANT: 使用常数填充边界 (i.e. 黑色或者
 )
) - BORDER_REPLICATE: 复制原图中最临近的行或者列。
源码部分给出更加详细的解释。
- BORDER_CONSTANT: 使用常数填充边界 (i.e. 黑色或者
源码
本程序做什么?
装载图像
由用户决定使用哪种填充方式。有两个选项:
- 常数边界: 所有新增边界像素使用一个常数,程序每0.5秒会产生一个随机数更新该常数值。
- 复制边界: 复制原图像的边界像素。
用户可以选择按 ‘c’ 键 (常数边界) 或者 ‘r’ 键 (复制边界)
当用户按 ‘ESC’ 键,程序退出。
下面是本教程的源码, 你也可以从 这里 下载
#include "opencv2/imgproc/imgproc.hpp"
#include "opencv2/highgui/highgui.hpp"
#include <stdlib.h>
#include <stdio.h>

using namespace cv;

/// 全局变量
Mat src, dst;
int top, bottom, left, right;
int borderType;
Scalar value;
char* window_name = "copyMakeBorder Demo";
RNG rng(12345);

/** @函数 main  */
int main( int argc, char** argv )
{

  int c;

  /// 装载图像
  src = imread( argv[1] );

  if( !src.data )
  { return -1;
    printf(" No data entered, please enter the path to an image file \n");
  }

  /// 使用说明
  printf( "\n \t copyMakeBorder Demo: \n" );
  printf( "\t -------------------- \n" );
  printf( " ** Press 'c' to set the border to a random constant value \n");
  printf( " ** Press 'r' to set the border to be replicated \n");
  printf( " ** Press 'ESC' to exit the program \n");

  /// 创建显示窗口
  namedWindow( window_name, CV_WINDOW_AUTOSIZE );

  /// 初始化输入参数
  top = (int) (0.05*src.rows); bottom = (int) (0.05*src.rows);
  left = (int) (0.05*src.cols); right = (int) (0.05*src.cols);
  dst = src;

  imshow( window_name, dst );

  while( true )
    {
      c = waitKey(500);

      if( (char)c == 27 )
        { break; }
      else if( (char)c == 'c' )
        { borderType = BORDER_CONSTANT; }
      else if( (char)c == 'r' )
        { borderType = BORDER_REPLICATE; }

      value = Scalar( rng.uniform(0, 255), rng.uniform(0, 255), rng.uniform(0, 255) );
      copyMakeBorder( src, dst, top, bottom, left, right, borderType, value );

      imshow( window_name, dst );
    }

  return 0;
}
解释
首先申明程序中用到的变量:
Mat src, dst;
int top, bottom, left, right;
int borderType;
Scalar value;
char* window_name = "copyMakeBorder Demo";
RNG rng(12345);
尤其要注意变量 rng ,这是一个随机数生成器, 用来产生随机边界色彩。
装载原图像 src:
src = imread( argv[1] );

if( !src.data )
{ return -1;
  printf(" No data entered, please enter the path to an image file \n");
}
在简要说明了程序的使用方法后,创建一个显示窗口:
namedWindow( window_name, CV_WINDOW_AUTOSIZE );
初始化边界宽度参数(top, bottom, left 和 right)。我们将它们设定为图像 src 大小的5%。
top = (int) (0.05*src.rows); bottom = (int) (0.05*src.rows);
left = (int) (0.05*src.cols); right = (int) (0.05*src.cols);
程序进入 while 循环。 如果用户按’c’键或者 ‘r’键, 变量 borderType 分别取值 BORDER_CONSTANT 或 BORDER_REPLICATE :
while( true )
 {
   c = waitKey(500);

   if( (char)c == 27 )
     { break; }
   else if( (char)c == 'c' )
     { borderType = BORDER_CONSTANT; }
   else if( (char)c == 'r' )
     { borderType = BORDER_REPLICATE; }
每个循环 (周期 0.5 秒), 变量 value 自动更新...
value = Scalar( rng.uniform(0, 255), rng.uniform(0, 255), rng.uniform(0, 255) );
为一个由 RNG 类型变量 rng 产生的随机数。 随机数的范围在
![[0,255]](../../../../../_images/math/0fb139e8e3c75ef24fe4eac5ba07c800abd7c943.png) 之间。
之间。最后调用函数 copyMakeBorder 填充边界像素:
copyMakeBorder( src, dst, top, bottom, left, right, borderType, value );
接受参数:
- src: 原图像
- dst: 目标图像
- top, bottom, left, right: 各边界的宽度,此处定义为原图像尺寸的5%。
- borderType: 边界类型,此处可以选择常数边界或者复制边界。
- value: 如果 borderType 类型是 BORDER_CONSTANT, 该值用来填充边界像素。
显示输出图像
imshow( window_name, dst );
结果
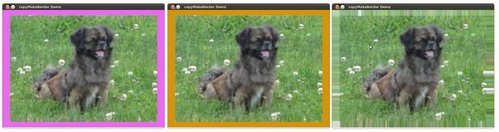
在编译上面的代码之后, 我们可以运行结果,将图片路径输入。 结果应该为:
- 程序启动时边界类型为 BORDER_CONSTANT (0), 因此,一开始边界颜色任意变换。
- 如果用户按 ‘r’ 键, 边界将会变成原图像边缘的拷贝。
- 如果用户按 ‘c’ 键, 边界再次变为任意颜色。
- 如果用户按 ‘ESC’ 键,程序退出。
下面显示了几张截图演示了边界颜色如何改变,以及在边界类型为 BORDER_REPLICATE 时的情形:
翻译者
niesu@ OpenCV中文网站 <sisongasg@hotmail.com>
Help and Feedback
You did not find what you were looking for?- Ask a question in the user group/mailing list.
- If you think something is missing or wrong in the documentation, please file a bug report.