图像金字塔
原理
Note
以下内容来自于Bradski和Kaehler的大作: Learning OpenCV 。
- 当我们需要将图像转换到另一个尺寸的时候, 有两种可能:
- 放大 图像 或者
- 缩小 图像。
- 尽管OpenCV 几何变换 部分提供了一个真正意义上的图像缩放函数(resize, 在以后的教程中会学到),不过在本篇我们首先学习一下使用 图像金字塔 来做图像缩放, 图像金字塔是视觉运用中广泛采用的一项技术。
图像金字塔
- 一个图像金字塔是一系列图像的集合 - 所有图像来源于同一张原始图像 - 通过梯次向下采样获得,直到达到某个终止条件才停止采样。
- 有两种类型的图像金字塔常常出现在文献和应用中:
- 高斯金字塔(Gaussian pyramid): 用来向下采样
- 拉普拉斯金字塔(Laplacian pyramid): 用来从金字塔低层图像重建上层未采样图像
- 在这篇文档中我们将使用 高斯金字塔 。
高斯金字塔
想想金字塔为一层一层的图像,层级越高,图像越小。
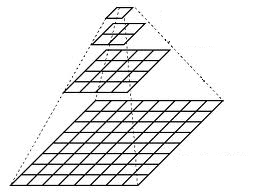
每一层都按从下到上的次序编号, 层级
 (表示为
(表示为  尺寸小于层级
  (
( ))。
))。为了获取层级为
的金字塔图像,我们采用如下方法:将
与高斯内核卷积: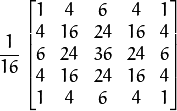
将所有偶数行和列去除。
显而易见,结果图像只有原图的四分之一。通过对输入图像
 (原始图像) 不停迭代以上步骤就会得到整个金字塔。
以上过程描述了对图像的向下采样,如果将图像变大呢?:
- 首先,将图像在每个方向扩大为原来的两倍,新增的行和列以0填充(
 )
) - 使用先前同样的内核(乘以4)与放大后的图像卷积,获得 “新增像素” 的近似值。
- 首先,将图像在每个方向扩大为原来的两倍,新增的行和列以0填充(
这两个步骤(向下和向上采样) 分别通过OpenCV函数 pyrUp 和 pyrDown 实现, 我们将会在下面的示例中演示如何使用这两个函数。
Note
我们向下采样缩小图像的时候, 我们实际上 丢失 了一些信息。
源码
本教程的源码如下,你也可以从 这里 下载
#include "opencv2/imgproc/imgproc.hpp"
#include "opencv2/highgui/highgui.hpp"
#include <math.h>
#include <stdlib.h>
#include <stdio.h>

using namespace cv;

/// 全局变量
Mat src, dst, tmp;
char* window_name = "Pyramids Demo";


/**
 * @函数 main
 */
int main( int argc, char** argv )
{
  /// 指示说明
  printf( "\n Zoom In-Out demo  \n " );
  printf( "------------------ \n" );
  printf( " * [u] -> Zoom in  \n" );
  printf( " * [d] -> Zoom out \n" );
  printf( " * [ESC] -> Close program \n \n" );

  /// 测试图像 - 尺寸必须能被 2^{n} 整除
  src = imread( "../images/chicky_512.jpg" );
  if( !src.data )
    { printf(" No data! -- Exiting the program \n");
      return -1; }

  tmp = src;
  dst = tmp;

  /// 创建显示窗口
  namedWindow( window_name, CV_WINDOW_AUTOSIZE );
  imshow( window_name, dst );

  /// 循环
  while( true )
  {
    int c;
    c = waitKey(10);

    if( (char)c == 27 )
      { break; }
    if( (char)c == 'u' )
      { pyrUp( tmp, dst, Size( tmp.cols*2, tmp.rows*2 ) );
        printf( "** Zoom In: Image x 2 \n" );
      }
    else if( (char)c == 'd' )
     { pyrDown( tmp, dst, Size( tmp.cols/2, tmp.rows/2 ) );
       printf( "** Zoom Out: Image / 2 \n" );
     }

    imshow( window_name, dst );
    tmp = dst;
  }
  return 0;
}
解释
让我们来回顾一下本程序的总体流程:
装载图像(此处路径由程序设定,用户无需将图像路径当作参数输入)
/// 测试图像 - 尺寸必须能被 2^{n} 整除
src = imread( "../images/chicky_512.jpg" );
if( !src.data )
  { printf(" No data! -- Exiting the program \n");
    return -1; }
创建两个Mat实例, 一个用来储存操作结果(dst), 另一个用来存储零时结果(tmp)。
Mat src, dst, tmp;
/* ... */
tmp = src;
dst = tmp;
创建窗口显示结果
namedWindow( window_name, CV_WINDOW_AUTOSIZE );
imshow( window_name, dst );
执行无限循环,等待用户输入。
while( true )
{
  int c;
  c = waitKey(10);

  if( (char)c == 27 )
    { break; }
  if( (char)c == 'u' )
    { pyrUp( tmp, dst, Size( tmp.cols*2, tmp.rows*2 ) );
      printf( "** Zoom In: Image x 2 \n" );
    }
  else if( (char)c == 'd' )
   { pyrDown( tmp, dst, Size( tmp.cols/2, tmp.rows/2 ) );
     printf( "** Zoom Out: Image / 2 \n" );
   }

  imshow( window_name, dst );
  tmp = dst;
}
如果用户按 ESC 键程序退出。 此外,它还提供两个选项:
向上采样 (按 ‘u’)
pyrUp( tmp, dst, Size( tmp.cols*2, tmp.rows*2 )
函数 pyrUp 接受了3个参数:
- tmp: 当前图像, 初始化为原图像 src 。
- dst: 目的图像( 显示图像,为输入图像的两倍)
- Size( tmp.cols*2, tmp.rows*2 ) : 目的图像大小, 既然我们是向上采样, pyrUp 期待一个两倍于输入图像( tmp )的大小。
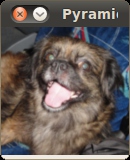
向下采样(按 ‘d’)
pyrDown( tmp, dst, Size( tmp.cols/2, tmp.rows/2 )
类似于 pyrUp, 函数 pyrDown 也接受了3个参数:
- tmp: 当前图像, 初始化为原图像 src 。
- dst: 目的图像( 显示图像,为输入图像的一半)
- Size( tmp.cols/2, tmp.rows/2 ) :目的图像大小, 既然我们是向下采样, pyrDown 期待一个一半于输入图像( tmp)的大小。
注意输入图像的大小(在两个方向)必须是2的冥,否则,将会显示错误。
最后,将输入图像 tmp 更新为当前显示图像, 这样后续操作将作用于更新后的图像。
tmp = dst;
结果
 , 因此向下采样不会产生错误(
 )。 原图像如下所示:
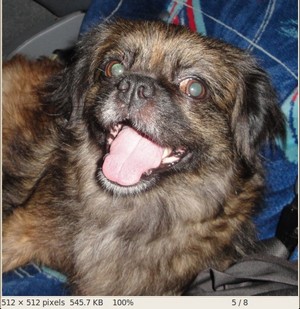
翻译者
niesu@ OpenCV中文网站 <sisongasg@hotmail.com>
Help and Feedback
You did not find what you were looking for?- Ask a question in the user group/mailing list.
- If you think something is missing or wrong in the documentation, please file a bug report.