基本绘图
目的
本节你将学到:
OpenCV 原理
本节中,我门将大量使用 Point 和 Scalar 这两个结构:
 和
和  指定的2D点。可定义为:
Scalar
表示了具有4个元素的数组。次类型在OpenCV中被大量用于传递像素值。
本节中,我们将进一步用它来表示RGB颜色值(三个参数)。如果用不到第四个参数,则无需定义。
我们来看个例子,如果给出以下颜色参数表达式:
Scalar( a, b, c )
那么定义的RGB颜色值为: Red = c, Green = b and Blue = a
代码分析
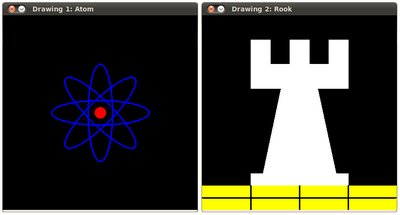
我们打算画两个例子(原子和赌棍), 所以必须创建两个图像和对应的窗口以显示。
/// 窗口名字
char atom_window[] = "Drawing 1: Atom";
char rook_window[] = "Drawing 2: Rook";

/// 创建空全黑像素的空图像
Mat atom_image = Mat::zeros( w, w, CV_8UC3 );
Mat rook_image = Mat::zeros( w, w, CV_8UC3 );
创建用来画不同几何形状的函数。比如用 MyEllipse 和 MyFilledCircle 来画原子。
/// 1. 画一个简单的原子。

/// 1.a. 创建椭圆
MyEllipse( atom_image, 90 );
MyEllipse( atom_image, 0 );
MyEllipse( atom_image, 45 );
MyEllipse( atom_image, -45 );

/// 1.b. 创建圆
MyFilledCircle( atom_image, Point( w/2.0, w/2.0) );
接下来用 MyLine*,*rectangle 和 a MyPolygon 来画赌棍:
/// 2. 画一个赌棍

/// 2.a. 创建一个凸多边形
MyPolygon( rook_image );

/// 2.b. 创建矩形
rectangle( rook_image,
           Point( 0, 7*w/8.0 ),
           Point( w, w),
           Scalar( 0, 255, 255 ),
           -1,
           8 );

/// 2.c. 画几条直线
MyLine( rook_image, Point( 0, 15*w/16 ), Point( w, 15*w/16 ) );
MyLine( rook_image, Point( w/4, 7*w/8 ), Point( w/4, w ) );
MyLine( rook_image, Point( w/2, 7*w/8 ), Point( w/2, w ) );
MyLine( rook_image, Point( 3*w/4, 7*w/8 ), Point( 3*w/4, w ) );
现在来看看每个函数内部如何定义:
MyLine
void MyLine( Mat img, Point start, Point end )
{
  int thickness = 2;
  int lineType = 8;
  line( img,
        start,
        end,
        Scalar( 0, 0, 0 ),
        thickness,
        lineType );
}
正如我们所见, MyLine 调用函数 line 来实现以下操作:
- 画一条从点 start 到点 end 的直线段
- 此线段将被画到图像 img 上
- 线的颜色由 Scalar( 0, 0, 0) 来定义,在此其相应RGB值为 黑色
- 线的粗细由 thickness 设定(此处设为 2)
- 此线为8联通 (lineType = 8)
MyEllipse
void MyEllipse( Mat img, double angle )
{
  int thickness = 2;
  int lineType = 8;

  ellipse( img,
           Point( w/2.0, w/2.0 ),
           Size( w/4.0, w/16.0 ),
           angle,
           0,
           360,
           Scalar( 255, 0, 0 ),
           thickness,
           lineType );
}
根据以上代码,我们可看到函数 ellipse 按照以下规则绘制椭圆:
- 椭圆将被画到图像 img 上
- 椭圆中心为点 (w/2.0, w/2.0) 并且大小位于矩形 (w/4.0, w/16.0) 内
- 椭圆旋转角度为 angle
- 椭圆扩展的弧度从 0 度到 360 度
- 图形颜色为 Scalar( 255, 255, 0) ,既蓝色
- 绘椭圆的线粗为 thickness ,此处是2
MyFilledCircle
void MyFilledCircle( Mat img, Point center )
{
 int thickness = -1;
 int lineType = 8;

 circle( img,
         center,
         w/32.0,
         Scalar( 0, 0, 255 ),
         thickness,
         lineType );
}
类似于椭圆函数,我们可以看到 circle 函数的参数意义如下:
- 圆将被画到图像 ( img )上
- 圆心由点 center 定义
- 圆的半径为: w/32.0
- 圆的颜色为: Scalar(0, 0, 255) ,按BGR的格式为 红色
- 线粗定义为 thickness = -1, 因此次圆将被填充
MyPolygon
void MyPolygon( Mat img ) { int lineType = 8; /** 创建一些点 */ Point rook_points[1][20]; rook_points[0][0] = Point( w/4.0, 7*w/8.0 ); rook_points[0][1] = Point( 3*w/4.0, 7*w/8.0 ); rook_points[0][2] = Point( 3*w/4.0, 13*w/16.0 ); rook_points[0][3] = Point( 11*w/16.0, 13*w/16.0 ); rook_points[0][4] = Point( 19*w/32.0, 3*w/8.0 ); rook_points[0][5] = Point( 3*w/4.0, 3*w/8.0 ); rook_points[0][6] = Point( 3*w/4.0, w/8.0 ); rook_points[0][7] = Point( 26*w/40.0, w/8.0 ); rook_points[0][8] = Point( 26*w/40.0, w/4.0 ); rook_points[0][9] = Point( 22*w/40.0, w/4.0 ); rook_points[0][10] = Point( 22*w/40.0, w/8.0 ); rook_points[0][11] = Point( 18*w/40.0, w/8.0 ); rook_points[0][12] = Point( 18*w/40.0, w/4.0 ); rook_points[0][13] = Point( 14*w/40.0, w/4.0 ); rook_points[0][14] = Point( 14*w/40.0, w/8.0 ); rook_points[0][15] = Point( w/4.0, w/8.0 ); rook_points[0][16] = Point( w/4.0, 3*w/8.0 ); rook_points[0][17] = Point( 13*w/32.0, 3*w/8.0 ); rook_points[0][18] = Point( 5*w/16.0, 13*w/16.0 ); rook_points[0][19] = Point( w/4.0, 13*w/16.0) ; const Point* ppt[1] = { rook_points[0] }; int npt[] = { 20 }; fillPoly( img, ppt, npt, 1, Scalar( 255, 255, 255 ), lineType ); } 我们用函数 :fill_poly:`fillPoly <>` 来绘制填充的多边形。请注意:- 多边形将被画到图像 img 上
- 多边形的顶点集为 ppt
- 要绘制的多边形顶点数目为 npt
- 要绘制的多边形数量仅为 1
- 多边形的颜色定义为 Scalar( 255, 255, 255), 既BGR值为 白色
rectangle
rectangle( rook_image,
           Point( 0, 7*w/8.0 ),
           Point( w, w),
           Scalar( 0, 255, 255 ),
           -1,
           8 );
最后是函数:rectangle:rectangle <> (我们并没有为这家伙创建特定函数)。请注意:
- 矩形将被画到图像 rook_image 上
- 矩形两个对角顶点为 Point( 0, 7*w/8.0 ) 和 Point( w, w)
- 矩形的颜色为 Scalar(0, 255, 255) ,既BGR格式下的 黄色
- 由于线粗为 -1, 此矩形将被填充
翻译者
刘瑞华 <lurvhua@163.com>
Help and Feedback
You did not find what you were looking for?- Ask a question in the user group/mailing list.
- If you think something is missing or wrong in the documentation, please file a bug report.